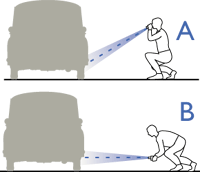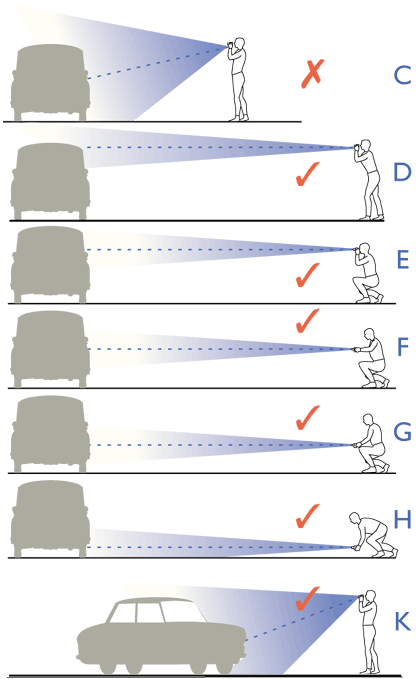


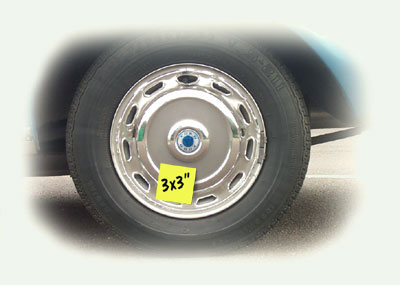
| For portraits required of cars already drawn (see the various lists) You probably only need to send 4 or 5(quality not important) 1: Dashboard (easy for open tops or 4 seaters when one can get in the back. Harder for 2-seater coupes. 2: 3/4 front (showing badges, spotlights (if any) license plate, overiders etc as well as type of wheels. 3: Rear, showing exhaust, license plate. 4: For sports cars a hood up version (or hard top fitted) with any detachable side windows fitted, for style & colour. 5: If the wheel are non-standard and you haven't found an example on another drawing, square-on like example right. Preferred format for emailed photographs: JPEG please. Direct from the camera or scanner. (I may need to lighten shadows to see normally hidden detail. I can't do this without spending extra time extracting pictures from other formats such as Word, Pdf, Powerpoint etc.) For racing cars, cars not drawn yet and cars with unusual or non-standard features you may need to include photographs that require a bit more effort on your part. Apologies in advance if I'm ' teaching grannies to suck eggs' but normal photographic techniques and settings would be insufficient in providing adequate information for a Technical Portrait to be created from that has not already been drawn. THE DIAGRAMS for new car drawings (right) 1. To provide an accurate sense of scale to such items as wheels affix with tape or Blue Tac an object such as white plastic ruler or piece of card that has clearly marked measurements in dark ink near the centre of the area photographed. A post-it can also work well as shown on the wheel tmage. 2. To minimise perspective, use the zoom on your camera and stand a suitable distance away, photographing the subject square-on.(See diagrams ‘D’ to ‘H’ below right) 3. Take shots at different heights , keeping the camera parallel to the ground.( ‘D’ to ‘H’ ) 4. If using a digital camera, take as many pictures as your patience can bear, burn to CD if you have access to a PC. (From my point of view I would rather have too much reference material, than not enough.)
Diagram ‘C' although may not be completly useless, on its own would be insufficent and may be misleading. Diagrams ‘D’ to ‘H' zoom lense, square on about 2 car lengths away. Useful, accurate information is obtained, especially if an assitant fixes a ruler suitable object to the car at the centre of each shot. Unfortunately I have apply the same technique horizontaly and take up to 40 shots of one side, of front and of rear when first creating enough information for the original drawing. Together with about 100 measurements of the whole car. I can only imagine the speculation that arose as to what owners and me were up to while undergoing this task at classic car rallies and in public car parks! Diagram ‘K’ - from each corner, three quarter, wide angle or normal lens, similar to ‘A’ but of greater value as it shows depth, especially as ‘B' to ‘F' pictures may contain optical illusions from reflections or shadows. Four shots required. If its a car you no longer own it’s quite likely that this type of photograph is all you have. A front three-quarter view shot of this kind is similar to what people only take when they haven't read this page! Photographs provided by you may only be sufficient in providing information fo altering existing drawings and possibly not creating new ones. New drawings require comprehensive measurements, research and studies. |